If you are my good friend Cheryl (who has not updated her blog since the beginning of time), you may not want to continue reading this post because it will ruin the surprise. But I'll leave it up to you...
I'm going to give you my instructions for making a quilted notebook cover. There are a few tutorials out there on the 'net, and they're good. My method is pretty good, too. It works for me, so I'll share.
I've made three of these little books so far. The first one was for the OnlyChild. Hers is now filthy and well-loved.
Then I made one for me (probably for me, but I might end up giving it away - who knows?)
Yesterday, I made another one - this time for Cheryl. And I remembered to take photos so I could share the process with you! So here goes...
Supplies:
1 dollar-store notebook (the kind with a flexible cardboard cover)
pretty fabric for outside (a fat quarter will give you lots of scraps)
muslin for inside and sleeves
piece of batting
coordinating fabric for binding
button
small hair elastic (or a 2" piece of narrow elastic)
Step One:
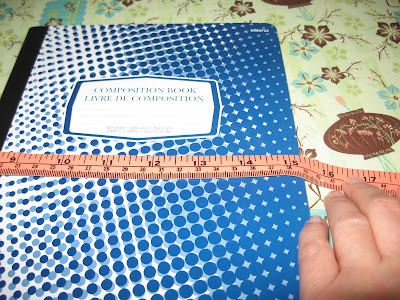
Start by measuring the height of your notebook. Write down this measurement.
Then measure the width of your notebook from the back around to the front, including the spine. Write this down too.
To each measurement add 3/4" - these will be the dimensions you will cut later.
Now add another 2 to 2 1/2" to your measurements. You will cut the fabric this size. Trust me.
For example: the height of my book was 9 3/4" and the width around (back, spine, and front together) was 15 1/4". My "finished" dimensions will be 10 1/2" x 15 3/4" but I actually cut the fabric 12" x 17". I learned to do this from the first attempt.
Step Two:
Cut your fabric, batting, and lining (muslin) all the same size. Cut 2 sleeves from muslin that are the "finished" height x about 1/3 of the "finished" width of the fabric.
Step Three:
Sandwich your three layers, pin-baste and quilt as desired. I chose to do straight lines, starting in the middle and sewing 1/2" apart. I need to practice my straight-line quilting, plus I didn't want any fancy pattern interfering with the beauty of this Chinese lantern fabric.
Step Four:
Once you have quilted your piece, you can cut to the "finished" size, as we discussed above. Remember, this is 3/4" bigger than the size of the book measurements you took initially. Check your measurements before cutting!
Step Five:
Hem one long end of each sleeve with a 1/4" hem.
Step Six:
Line up your sleeves against the short ends of the cover - one on each side (on the inside of course) with the hem facing the middle of the piece. (Does that make sense? Sounds a little loopy to me, even though I know what I mean.) Baste the three edges. You might be sorry if you skip the basting.
Why don't I have a photo of that step???
Step Seven:
Now you're going to bind this baby, just like it's a mini-quilt (because that's what it is). I like to cut my binding pieces 2 1/4" wide, but I think 2" would do just as well.
Bind the short edges first so you can catch the sleeves in the binding.
If you want a closure on your notebook cover, now is the time to add one. Decide which is the back of the cover and place a hair elastic in the middle of the edge, between the front and the binding. Pin in place and when you sew, go back and forth over it a couple of times to make sure it stays there.
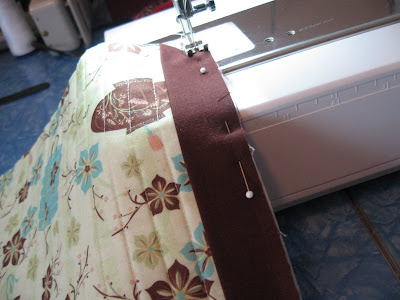
Now you're going to sew on that binding using a 1/4" seam allowance. Easy, right? You could probably use a continuous, mitred-corner binding, but I'm not proficient in that method so I don't. Do what works best for you.
Once you've machine stitched the binding, flip it to the back and hand-sew it down carefully.
Step Eight:
Add a beautiful button. Slide your notebook inside by slipping the notebook covers into the sleeves, front and back. You may have to slightly bend the covers to get them in, but that's okay - we bought flexible notebooks for just that reason. Pull the hair elastic round to the front and secure over the beautiful button.
Step Nine:
Take some pictures of your wonderful creation and admire its beauty. If you're still feeling creative, you can always use your scraps to make a matching change purse.
Step Ten:
And if you're still not ready to go to bed, you can bake some mini cupcakes for your students because it's their last day of school (even if it's not yours)... or if you don't have students, make them for yourself. You deserve them; you did work hard, after all.
Please let me know if you have any questions or if something isn't clear. And if you make one of these little cuties, send me a photo. I'd love to see it!
Cheryl... your notebook and change purse are in the mail... Surprise!
p.s. This project was featured on One Pretty Thing today :)


12 comments:
Thanks so much for the Tutorial Rachel. What a great gift to give. We all better start thinking Christmas...
Your quilted notebook covers are so pretty. I like that Chinese Lantern fabric. Do you ever read the Somerset magazines? One of their current challenges is submissions on crafting with dollar store items. Your notebook covers would be perfect.
What a great tut.....those buns below look ooohhhh soooo good.
I'll skip the cuppies, but you can sure send me that red/white notebook cover....LOVE IT!!
I guess I will pull some fabric and make my own....
Great tute...thanks
LOVE IT!!!! It's RED too. And can I please have some cupcakes??? I'm hungry!!!
Rachel - You are wonderful! I will be making that = maybe this week!!!
Beautiful but I am not sure I am up to that hard a project. Maybe later this summer. You are an amazing lady with all you beautiful quilted projects.
Dogwood
Love the tutorial - the red and white is very pretty. Those cupcakes look so yummy, but I must resist. Hugs :)
oh i love how easy you've made it! this might just be the younger generation's christmas gifts this year!
Pretty!!! Thanks for the tut!! Yummmm gimmie chocolate!!
Thanks for the info Rachel -- I have some of those notebooks and I really need to cover them -- they're ugly as they are! And you DID do the cupcakes -- good for you!!!
Thanks Rachel! I'm going to make one for Amelia. She loves to "journal"... just practices her letter writing and such. She'll love to have a special notebook just for that.
Post a Comment