Saturday, April 30, 2011

O'Cherries O'Completed

I finally got around to those last two borders on O'Cherries and the binding. Last night while Mr. P took the OnlyChild to the mall to get her computer fixed - and I had the house to myself - I was able to get the job done.

And this afternoon, I took some photos. Here is O'Cherries lying on top of the yet to be quilted (or even basted) Postage Stamp top.


Then I went outside and side-stepped dog poo to take some on-the-fence pictures. Gotta love Spring. The snow has barely melted (there's still a nasty, dirty patch in the back corner of the yard by the shed) and the lawn needs raking something fierce. Mr. P promises he'll get to it. Right now, he's dozing on the couch while the hockey game is on t.v. Gotta love men. And Stanley Cup playoffs. And lazy Saturdays.


I like how this quilt turned out...BUT...this is probably the first time I've ever thought a quilt looked better before it was washed. The crinkly, washed look takes away from the feather designs I quilted. And I was really proud of that quilting. I wish I'd taken a few photos of it before I washed it. I should have used a spray bottle to get the markings out and let it dry naturally.


A close-up of the quilting. See what I mean about the crinkliness obscuring the quilting design?


A view of the back. I used some leftover honey-bun strips to make my "signature" racing stripe on the back.


The sky looks nice and blue and benign in that last photo, but here's what it looked like behind me.


And a view of the front out of the window on the stairs. Threatening and scary!


Seriously, not two minutes after I came inside it started to rain. Good timing or what?

I hope you're enjoying your Saturday. I spent 4 1/2 hours this morning marking essays and assignments. I still have plenty of school work to do this weekend and I start a new master's course on Monday. But for now, I need to do something fun and satisfying...start a new project, maybe?

Update: This project was linked to Fabric Tuesday on Quilt Story. I hope you'll come and have a look at all the great projects.


Tuesday, April 26, 2011

Slow and Steady

I thought I would take the slow and steady route while quilting O'Cherries. You know what I'm like when I get to the quilting stage...scared silly! In fact, I did all the straight line quilting first (as you all recommended) and then I proceeded to sew in all my loose ends.

Procrastinating? Just a bit.

Yesterday afternoon, I sat at the sewing machine and told myself, "Just try one of those feather wreaths and see how it goes." I fully expected to spend the rest of the afternoon ripping out stitches.

But, you know what? It was easier than I expected.


So much easier, in fact, that I stitched all twelve feather wreaths.

Here is a view of the back. I think it looks so nice on the back because there isn't any of that blue ink to get in the way of the design.


And then I moved onto the borders.


I got two out of the four borders quilted before I realized that I hadn't finished all my school work (and that I didn't have another day off boo hoo). I had to put the quilting away and complete the final evaluation for my student teacher.


I can't wait to finish the last two borders and put the binding on this baby. I always get excited when I'm that close to being done. The finished product is really my favourite part of sewing and quilting. Don't get me wrong - I love the process too.

But looking at something and knowing that I made it is so very satisfying.

This post is linked to Fabric Tuesday on Quilt Story. Come and have a look!

Sunday, April 24, 2011

Scenes from a Sunny Morning

Happy Easter!

Here's what I'm seeing on this beautiful morning:

AbbyDog enjoying a rest in the sun.


 Until DerbyDog disturbs her peace with kisses.


The OnlyChild's paintbrushes on the dining room table.


Quilts caught in a sunbeam.


Pink Peeps Bunny Bunting hanging on the shutters. 


An Easter gift for the OnlyChild (a book, a gift card, pink peeps, and some chocolate). 


O'Cherries on the sewing machine. The straight lines are almost completed; now to move onto the feathers! (I'm scared...) 


I hope you are enjoying this gorgeous day. It finally feels like Spring has arrived in our part of the world (we'll just ignore the dirty piles of snow in the backyard).

I have some school work to do (but no marking! scratch that - I forgot about the Dictatorship project in my bag), some laundry that needs to be taken care of, and then the day is mine - sewing, dog-walking, lazing around (not likely), eating the Easter Creme Eggs I know Mr. P has hidden for me. What are you looking forward to today?

Friday, April 22, 2011

Earth Day Project - Repurposed Shirt Pillow

Earth Day was created in 1970 to inspire awareness of the environment. One of Earth Day Canada's Top 10 actions to help the environment is "Don't Discard". The idea is to donate, reuse or recycle items rather than throwing them away. With that in mind, I created an Earth Day project.

This is my Repurposed Shirt Pillow. I used an old (but still decent) dress shirt that Mr. P had put in the Goodwill bag, a pillow form I already owned, and leftover strips from my Postage Stamp quilt.


All it took was those materials and about an hour of work play.


I used the button placket and the back of the shirt. The rest of the fabric from the shirt will go into my scrap bins - because it's nice, thick cotton - and the leftover buttons will, of course, be added to my button collection for use in future projects.


I'm really pleased with my little pillow. It was quick and easy, and it's going to look wonderful with the Postage Stamp and O'Cherries quilts...if I ever get them done.

If I didn't keep getting distracted by other things, I might have made some progress by now ;)


Happy Earth Day!


Wednesday, April 20, 2011

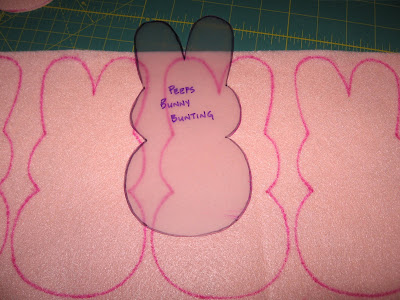
Pink Peeps Bunny Bunting

Say that ten times quickly!

Last night I couldn't sleep. Toss and turn. Look at the clock. Sigh and roll over. At 3:30 am, I decided to just get up instead of torturing myself.

And what does one do in the middle of the night when one cannot sleep? Make Pink Peeps Bunny Bunting, of course!

This pattern came from Dana at MADE. I've been wanting to make some bunny bunting for a while and I bought the felt pretty cheap at Joann's in Seattle. $2.49/yd (the lady at the cutting table laughed when I asked for a metre).

I made myself a template out of plastic because I'm pretty sure I'll be making more of these bunnies (I do have a lot of felt left over).


I drew around the template with a pink sharpie. You do not want to use your washable quilting marker for this. It will be ruined.


I tried to cut inside my marker lines so I didn't have dark pink residue on the bunny fur.


All lined up for their turn at the sewing machine!


Nine little bunnies on a polka-dot ribbon.


Oh my gosh, this is cute! I'm not sure I can part with it. Does an 18-year-old really need a bunny bunting?

Lately I've seen so many beautiful projects online. I wish all these patterns and tutorials had been around when the OnlyChild was a little girl. I used to make clothes for her (and matching outfits for her Cabbage Patch doll), but they were nothing like the gorgeous dresses, tops and toys available now. Thank you, all you bloggers, wherever you are, for so generously sharing your talent!

Monday, April 18, 2011

PS quilt top

Strips sewn into sets cut into segments sewn into blocks sewn into rows sewn into a QUILT TOP!

I finished the Postage Stamp quilt top last night, just before bedtime. I needed a little sewing time after the frustrating afternoon I had yesterday trying to do work for school and losing it on the computer (how does that happen anyway?) then having to re-do it.

Sewing was therapy.


I waited until after work (a loooonnnggg day!) to take pictures, hoping I would get some nice sunlight but I got home too late and the sun had already said goodnight.


This is our current "spare room", recently vacated by the nephew who came for a month and stayed for four. It used to be the OnlyChild's room and she picked the wall colours - red and green. Red and green? She was in grade 7 at the time and (if I remember correctly) she had blue hair. A word of advice for you: Never let a pre-teen with blue hair decorate her own room.

I'm going to repaint it - maybe a nice, buttery yellow - then move my sewing room in here because it's bigger. The bed, dresser and wicker chair will cross the hallway to occupy my tiny sewing room.


So, now I have two Oh Cherry Oh quilts to finish - Postage Stamp and O'Cherries.

Don't let me start anything new until they're done, okay?


This post was linked to Fabric Tuesday on Quilt Story!

Saturday, April 16, 2011

48 blocks

All 48 Postage Stamp blocks completed during the Friday Night Sew-In. Today, I laid them out, and numbered them.


Now to sew them together.

Weekend goal: completed quilt top!

How's my quilt-along friend Jen doing with her Postage Stamp quilt?

Friday, April 15, 2011

Let the fun begin!

I've been thinking about this all day - Friday Night Sew-In.


While the OnlyChild is downstairs painting, I'm working on the blocks for my Postage Stamp quilt.

I sewed some last night and need to press those.


And then I will continue sewing...28 down, only 20 to go!


Thursday, April 14, 2011

Sprinter?

Alberta is, once again, suffering from an identity crisis. Is it Winter? Is it Spring? Winter? Spring?

The victor in today's battle was...Winter!


Yep, our Christmas lights and decorations are still up on the house. Even before today's snowfall, there was still so much snow on the front lawn that we couldn't take them down yet. Yep, even though we are closer to Easter now than to Christmas.


And while I'm wishing for the snow to go away, I'll spend the evening inside with my Postage Stamp quilt, happily sewing together segments to make the blocks.


You can pop over to visit Jen, too, and see how she's coming along. I think she's pulled ahead of me again (not that it's a competition - oh no).

And don't forget that tomorrow is the Friday Night Sew-In. What will you be working on?

(I love their new button!)


Monday, April 11, 2011

My next project

I know...I know... my last project still needs to be finished. But there have been a few setbacks (some of my own doing, others not my fault) so I decided it was time to move on, to get back to the sewing machine, to start something new.

Jen and I are doing our own Postage Stamp quilt-along. I know she was way ahead of me last week, but I think I may have caught up over the weekend.

I sewed all my strip sets Friday night and Saturday. All 16 of them.


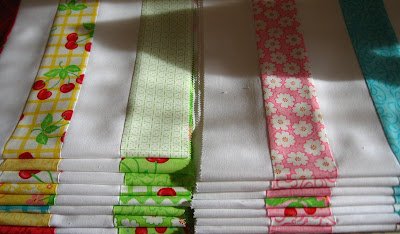
So pretty. So Spring-y.

I also cut all my segments yesterday.


The next step is block construction. Maybe tonight?

Maybe not...our administration called an impromptu staff meeting after school today. I actually fell asleep in it - not kidding! But that's not the worse part. I had plans to hightail it out of the building right after the bell and head to the fabric store to buy more thread so I could sew this evening. The long, drawn-out meeting scuttled those plans. The traffic would have been terrible in that part of the city by the time I got there, so I didn't go.

I might have enough light-coloured cotton thread to get a few blocks done, but what I really want is a hot bath, a good book, and an early bedtime. I just was not made for Mondays!


I linked this post to Fabric Tuesday on Quilt Story!

Saturday, April 09, 2011

Washi Eggs Tutorial


Many years ago, when the OnlyChild was just a baby and we still lived in the cold north, I met a woman who had spent quite a bit of time in Japan. She taught me how to make Washi Eggs.

"Washi" means Japanese Paper, and it is a strong, wood pulp-free paper made without chemicals. It is used for origimi and many other paper crafts. It's quite easy to find in stores such as Michael's.

Today, I'm going to show you how to make Washi Eggs. They're great for Easter decorating, but I keep mine out all year because they are so beautiful!

First, we'll gather our supplies:


Washi (one sheet per egg)
Tape Measure
Ruler
Pencil
Eraser
Sharp Scissors with a pointed tip
Cellulose/Rice Glue or Elmer's diluted with water
Water-based varnish
Paintbrush
Eggs - blown out, rinsed, and thoroughly dried
Wine (or tea, coffee, water) - this is going to be a relaxing and enjoyable craft so create your atmosphere

Step 1: 
Measure around the middle of egg. Add 1/2 cm to this measurement and mark the total on paper.


Step 2:
Measure around the egg, end to end. Take half of this measurement and mark on paper.


Step 3:
Cut paper to correct rectangular size.


Step 4:
Find the centre of the short sides of the paper. Mark 1/2 cm above and below the centre point on either short end. Connect the marks to draw two lines across the length of the paper to create a centre strip. Your markings should be as light as possible.


Step 5:
Draw two more lines on the paper, each one 1/2 way between the edge of the paper and the centre strip.


Step 6:
Along the long edges of the paper, measure and mark lines 1/2 cm apart.


Step 7:
Cut points resembling a picket fence on each side, from edge to first line. 


Step 8:
Cut rest of line between points up to centre strip. Do NOT cut into the centre strip. When you have all the cuts made, gently erase all the lines you can still see.

Now take a sip of wine before the next step.


Step 9:
Mix your glue. Remember, a little goes a long way! Using your fingers, apply your glue to the wrong side of your paper. Coat the entire paper. Be gentle; you don't want the Washi to tear. When the paper is coated with glue, begin applying to the egg. Centre paper on egg and smooth down a few flaps of paper on each end of the egg, one at a time so they overlap slightly. Continue around the rest of the egg, smoothing from the centre to each end with fingers to eliminate air bubbles and creases. Make as smooth as possible.


Step 10:
Carefully cut off any excess paper and smooth the seam with the back of a spoon or your fingers. Let dry. (I knew all those empty spools I was throwing in a mason jar would come in handy.)


The top will look like a star.

While you're waiting for this egg to dry, make another one. Then another. They're a bit addictive.


Step 11:
Varnish with acrylic, water-based varnish, using a brush. Apply 5-10 thin coats and let dry at least 1/2 hour between coats. Apply no more than 4 coats/day.

This is the brand I used - Jo Sonja's. I bought the bottle eons (at least 15 years) ago and I still have about 1/3 left. Like the glue, a little goes a long way. Another brand that is recommended is "Rock".


When you have a collection of Washi eggs, you can display them.

I've made many of these. Some were eaten by AbbyDog and a few others were broken by my clumsy and unapologetic nephew. Some of mine were made with hand-painted paper (plain Washi that I embellished with paint swishes). And last night I made one using part of a map of Texas. I didn't realize until I had it all done that I'd applied the map upside down. Oh well.


Here they are in a big vase on my dining room table.


And another shot. Not great pictures, because of the afternoon sun, but pretty nonetheless, especially sitting on my Spring Spell table runner.


I hope you decide to try this little project. It's fairly easy and these eggs make beautiful gifts. I have a set of smaller, Bantam chicken eggs that I made into Christmas ornaments with red and green Washi. But Easter is the time that they are really appreciated.

If you make some Washi Eggs, please let me know. I'd love to see them!